Goodbye and Hello

Hi,

After 10 years of blogging, here is my first vlog! From now on, you can expect only videos about Microsoft Project!

The channel is: Managing Projects with Microsoft tools: https://www.youtube.com/channel/UCEXjYVWzddohtykIqRvPIgQ

My first video is here: Introduction to Microsoft Project for the web – YouTube

Thank you very much for your comments, suggestions and reading during all those years. I hope that you will enjoy Videos as you enjoyed Blogs. I will keep posting my Videos on regular basics – once per week.

Love you all,

Nenad

Posted in MICROSOFT PROJECT, Microsoft Project for the Web, PMI, Power Apps, Power Platform, PRoject Management | Tagged | Leave a comment

How to know which Tasks are on Critical path in Microsoft Project for the Web?

Hi,

as we know, when we use Microsoft Project Desktop, or Project online, we have various ways to see Tasks on Critical path. In Microsoft Project for the Web, for now, there is not such option available. BUT! If you use Project Accelerator, there is a way to get them.

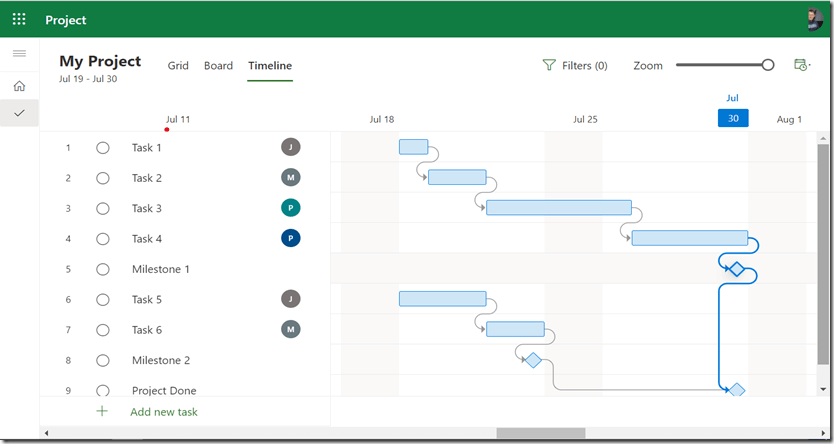
First of all I will create a Project using Microsoft Project for the Web:

imageLet’s see the Timeline View:

image

Remember, this is a simple Project, and I can see Critical path, but on more complex Project I will not be able to see it. So, I will export this Project using Project Accelerator:

image

and I will get:

image

Finally I will get:

image

As you can see, there is a Column called Critical! Be aware that here are all Tasks from just My Project, but if I have more that one Projects, all Tasks from all Projects will be shown here. So, if I want to see Tasks from Critical path on particular Project, first I have to filter Project (Column C), and then Critical Tasks (Column G).

It is bit complicated, but for now this is the way to get Critical Tasks.

Ladies and gentleman,  I am writing Blog Post weekly since 2012. I will continue with my community contribution, but from now on I will start to record Videos, e.g. I will start with Vlogs. Each and every time when I will publish new Video on my YouTube channel, you will be noticed here, with link provided.

I hope that you will enjoy them as you enjoyed my Blog post, and that it will be helpful.

Thank you very much for reading.

Best regards!

Posted in MICROSOFT PROJECT, Microsoft Project for the Web, PMI, Project for the Web, PRoject Management | Tagged | Leave a comment

Microsoft Project for the Web and Communication

Hi,

Today I will show you how to see your Project created in Microsoft Project for the Web and how to see it Microsoft Teams, and finally, how to communicate with the team members using Teams.

First thing first. Let me create a new Project, using Project for the Web:

image

OK, now I will make a connection within my Project and Microsoft Teams:

image

and:

image

and finally:

image

and I will get:

image

Now, I want to communicate with my Team members. Let’s say that I want to ask John, will he be finish with his Task on time, because if his Task 1 will be late, the whole Project will be late. I will follow next steps:

image  and here it is:

image

I will now mention John:

image

and then it’s easy:

image

So, use Teams for communication with your teams. You do not have to extensive mail communication with your team for each and every problem. I’m using Teams with my Project for the Web all the time.

Regards!

Posted in MICROSOFT PROJECT, Power Apps, Power Platform, Project for the Web, PRoject Management | Tagged | Leave a comment

Microsoft Project for the Web–where is database, and how to export data from it?

Hi,

I wrote a lot about Microsoft Project for the Web and Microsoft Project Accelerator App, and I will continue to do it, but I will start wit Vlogs. I will create videos about it.

For this post I will go beyond Project for the Web, and I will show you where is all information actually stored.

Let me First create a simple Project:

image

Now I will switch to Project Accelerator:

image

OK, everything looks fine. Now I will skip to PowerApps:

image

When I choose Tables I will get:

image

As you can see there are a lot of tables stored in Microsoft Dataverse (previously called – CDS). Let me choose, for example, Project Task Table:

image

I am not going to explain each and every Column, Tab, etc. for this or any other Table, because it is far beyond this post: I just want to show you where the data is stored. And one last thing. You I can export data from each table, like this:

image

and I will get:

image

In the screen above, there are only few fields shown, not all.

As you can see, data is stored in different tables, and if you want to explore them, you should pick a right table.

Regards

Posted in Power Apps, Power Platform, Project for the Web, Project for Web, PRoject Management | Tagged | Leave a comment

How to export Project data from Project Accelerator

Hi,

As you know, with Project for the Web you can export Project data, for single Project

Today I will show you how can you export data from multiple Projects to Excel, using Microsoft Project Accelerator.

First of all I will create two simple Projects using Microsoft Project for the Web

image

and:

image

Now I will skip to Project Accelerator:

image

and I will see Excel file in my Downloads folder:

image

When I open this file I will get:

image

As you can see, Project name, Start and Finish Date, Earliest Start, Total Effort, Completed Effort, % Complete and Project Status field are exported.

But wait? Where are the Tasks?

Well, that will be Topic for my next Blog Post Smile

Stay Tuned.

Best regards!

Posted in Microsoft Project for the Web, Project for the Web, Project for Web | Tagged | Leave a comment

Choice type custom field in Microsoft Project for the Web

Hello,

today I will show you new Custom field type which is available in Microsoft Project for the Web – Choice.

First, as I Always do I will create a new Project:

image Now, let’s say that I want for each Task have a Risk type: High, Medium, Low. For that I will crate the Custom field following next steps:

image

and:

image

and:

image

As you can see, if I need more than Three options, I can add them using Add a choice!

And that,s it. I can now choose for each Task, the Risk type:

image

If I want to reorder sequence, let’s say to Low, Medium high I can use CRTL+UP or CRL+DOWN keys for Windows or COMMAND+UP, COMMAND+Down for Mac.

Of course if I want to put Icons (Emoji) instead of letter I can do that as well using Win+; button:

image

An last but not least. I can create up to 20 choice type fields per Project, and when I copy Project, all those fields are going to be copied as well.

Very useful thing.

Best Regards!

Posted in PMI, Project for the Web, Project for Web, PRoject Management | Tagged | Leave a comment

Project progress using Project Accelerator and Microsoft Project for the Web

Hi,

today I will show you how can you see Project Progress using Project Accelerator.

First of all, I will create a brand new Project using Microsoft Project for the Web:

image

Now I will make Task 1 100% completed, for Task 2 I will say that 8 hours are completed, and For Task 3 I will say that 16 hour are completed:

image

Notice this:

  • Total Effort is: 8+16+24+32+40 hours = 120 hours
  • Total Effort completed = 8+8+16 = 32 hours
  • Total Duration is : 1+2+3+4+5 = 15 days
  • % Completeness = 32/120 = 0,27 = 27%

Now I will switch to Project accelerator:

image

On the main Project screen I can see total Effort, Completed effort and % Completeness for the whole Project. Now I will go further:

image

and I will get:

image

Her I can see for Schedule:

  • Estimated Start Date
  • Estimated Finished Date,
  • Duration,
  • % Completeness

And for the Effort:

    • Total Effort,
    • Completed Effort,
    • Remaining Effort

To conclude, if you use only Project for the Web, you will not see the overall Project status and Project Health. But, with Project Accelerator, you will. That is the reason why I recommend it so much!

Best regards!

    •  
    • % Completeness
Posted in PMI, Project for the Web, Project for Web, PRoject Management | Tagged , | Leave a comment

Changes and Microsoft Project for the Web

Hi,

today, I will show you how to handle Changes in Projects. First, I will create a project in Microsoft Project for the Web:

image_thumb11

Now I will jump to the Project accelerator:

image_thumb5

and:

image

and I will get:

image

  • Name: The Name for the Change
  • Project: The Project to which the Change belongs
  • State: Issue State. It can be: Proposed, Active, Close, On Hold
  • Approval: It can be: Not Yet Requested, Requested, Approved, Rejected
  • Change Impact: It can be: High, Medium, Low
  • Priority: It can be: Critical, High, Moderate, Low
  • Owner: The Person who own the Change
  • Requested By: The Person who requested Change
  • Requested Date: When the Change has been Requested
  • Assigned To: The Person to whom the Change is assigned to
  • Change Risk: It can be: High, Moderate, Low, None and it represent how the Change is risky
  • Change Type: It can be: Scope, Schedule, Cost, None and it represent to which Project component will Change has affect
  • Cost Impact: Amount of money which is basically Cost of doing the Change
  • Planned Start Date: When is working on change planned to start
  • Planned Due: When is working on change planned to be finished
  • Finally there is:

    image

    • Description: Change Description
    • Change Plan: How the change is going to be done / implemented
    • Change Benefits: What are the befits of this change to the Project
    • Additional comments

    And that is it!

    Regards!

    Posted in Microsoft Project for the Web, Project for the Web, Project for Web, PRoject Management | Tagged , | Leave a comment

    Issues and Microsoft Project for the Web

    Hi,

    today, I will show you how to handle Issues in Projects. First, I will create a project in Microsoft Project for the Web:

    image

    Now I will jump to the Project accelerator:

    image

    and:

    image

    Before creating a new Issue, let me explain the difference between Issues and Risks.

    Risk is always about future! So this is something that has probability greater than 0% and less than 100%. Let’s say that today is cloudy day. But not rainy. There is a risk that the rain will falls. On the other hand it may not be fall at all.

    BUT! If rain is already falling, than this is  an issue. So, Issue is something that is already happening, and something which we have to deal with right now.

    So let me create my Issue:

    image

    • Name: The Issue Name
    • Project: The Project to which the Issue belongs
    • State: Issue State. It can be: Proposed, Active, Close, On Hold
    • Issue Category: It can be: Issue, Task, Bug, Other
    • Owner: The Person who own the Issue
    • Requestor: The Person who request the Issue
    • Priority: It can be
      • (1) Critical
      • (2) High
      • (3) Moderate
      • (4) Low
    • Due Date: The Issue Due Date (the Deadline until it must / should be solved)

    image

    Finally there is:

    • Description: Issue Description
    • Resolution: The Issue Resolution (which can be entered either if I know the resolution right away, or after the Issue is going to be resolved)

    And that is it!

    Regards!

    Posted in Uncategorized | Leave a comment

    How to import Project from Project Desktop to Microsoft Project for the Web

    Hi,

    the new feature is here! From now on there is possibility to import Project from Project desktop to Microsoft Project for the Web!

    Let me show you how, and what are limitations.

    First of all, I will create a simple Project in Project Desktop:

    image

    As you can see, there are five Tasks:

    • Task 2 has Finish to Start relation to Task 1, Task 3 has Start to Start relation to Task 2, Task 4 has Finish to Finish relation to Task 3, and Task 5 has Finish to Start relation to Task 4. Task Done is milestone, and it has Finish to finish relation to all other Tasks.
    • All Tasks, except Milestone have Resources assigned
    • Task 1 is 100% completed, and Task 2 is 50% completed.

    No I will import it to Project for the Web:

    image

    and:

    image

    and then:

    image

    and finally:

    image

    This is what I get:

    image

    As you can see:

    • Resources are not imported
    • Relations are moved only for Finish to Start relations

    To see all limitations, check here:

    image

    Well done Microsoft, glad to have this!

    Regards!

    Posted in Microsoft Project for the Web, MS PROJECT 2019, Project for the Web, Project for Web | Tagged | Leave a comment